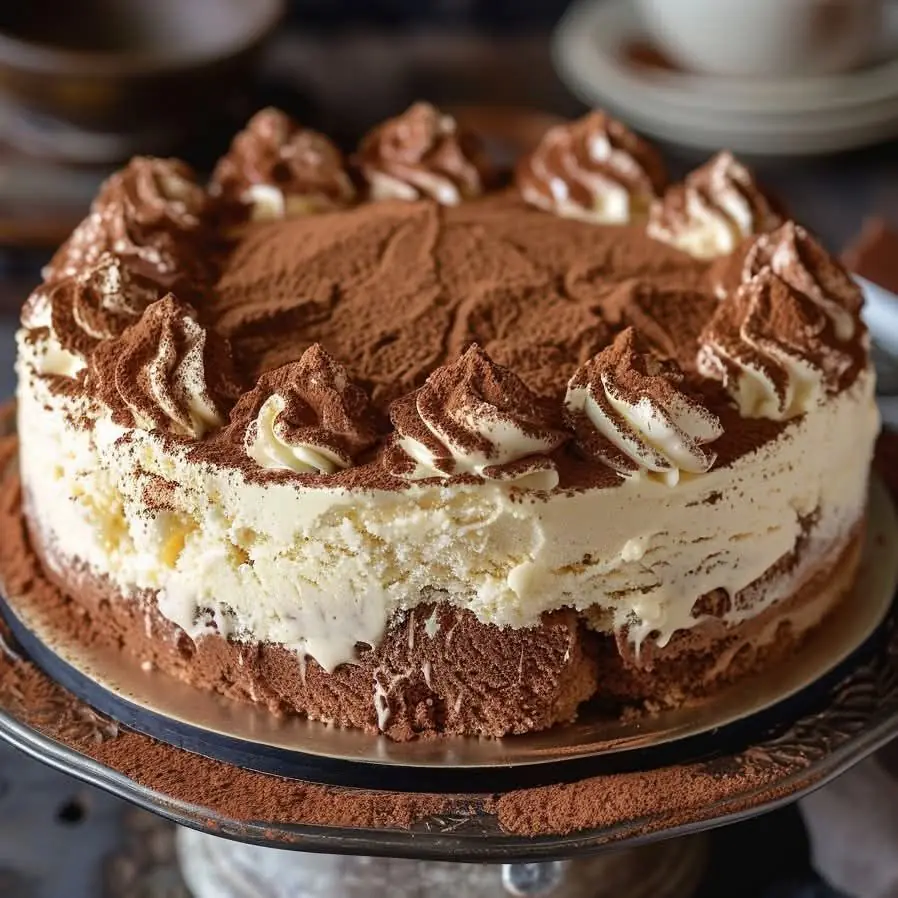
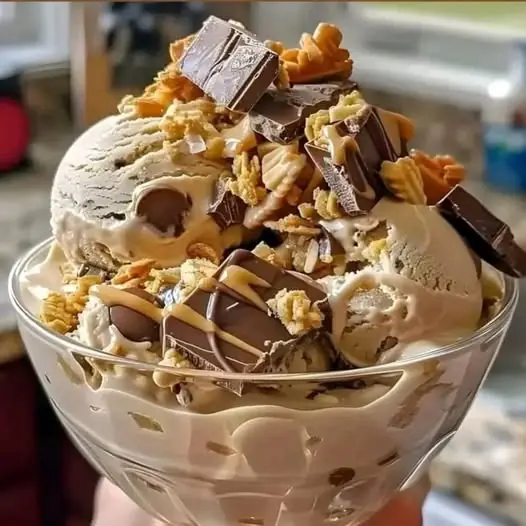
☕🍫 Mocha Noir Dream Ice Cream – A Dark Decadence of Coffee & Chocolate Splendor! 🍫☕

Indulge in the ultimate coffee and chocolate experience with this homemade Mocha Noir Dream Ice Cream. This frozen treat is intensely rich, creamy, and luxurious, blending the bold bitterness of freshly brewed coffee with the deep, velvety smoothness of dark chocolate. It’s the perfect dessert for coffee lovers and chocoholics alike!
With its silky texture and layers of decadent flavors, this ice cream is not only easy to make but also versatile, allowing you to customize it with mix-ins like chocolate chunks, coffee liqueur, or even espresso-infused swirls.
Let’s dive into this heavenly no-churn or machine-made mocha delight!
📋 Ingredients: The Perfect Fusion of Coffee & Chocolate
This Mocha Noir Dream Ice Cream is built on a foundation of high-quality ingredients, ensuring the most luxurious texture and intense flavor.
Base Ice Cream Mixture:
- 2 cups heavy cream (for rich, creamy texture)
- 1 cup whole milk (balances creaminess without being too heavy)
- 1 cup strong brewed coffee, chilled (espresso or dark roast recommended for robust flavor)
- ¾ cup granulated sugar (adds sweetness and prevents ice crystallization)
- 2 tbsp Dutch-processed cocoa powder (for a deep, rich chocolate taste)
- 1 tsp vanilla extract (enhances the overall flavor and aroma)
- ¼ tsp salt (brings out the chocolate and coffee flavors)
For the Chocolate Swirl & Mix-ins:
- 4 oz dark chocolate (70% cacao or higher), finely chopped
- ½ cup sweetened condensed milk (for extra smoothness and richness)
- 1 tbsp instant espresso powder (optional, but enhances the coffee flavor dramatically)
- 1 tbsp coffee liqueur (e.g., Kahlúa or Tia Maria, optional) (prevents ice crystals and adds a deeper coffee note)
- ½ cup chocolate chunks or chocolate-covered espresso beans (for extra texture and indulgence)
🥄 Instructions: Step-by-Step Guide to Coffee-Chocolate Bliss
Step 1: Brew & Chill the Coffee
- Start by brewing 1 cup of strong coffee or espresso. If using instant espresso powder, dissolve 1 tbsp in 1 cup of hot water.
- Allow the coffee to cool completely in the refrigerator. This prevents it from curdling the dairy in the ice cream base.
Step 2: Prepare the Mocha Ice Cream Base
- In a medium saucepan, whisk together the whole milk, sugar, cocoa powder, and salt over medium heat, stirring frequently until the sugar and cocoa are fully dissolved.
- Remove from heat and stir in the chilled brewed coffee and vanilla extract.
- If using, mix in the coffee liqueur to enhance the depth of flavor and ensure the ice cream remains silky smooth.
- Transfer the mixture to a bowl and refrigerate for at least 2 hours, or until fully chilled.
Step 3: Whip the Heavy Cream & Combine
- In a large mixing bowl, use a hand mixer or stand mixer to whip the heavy cream on medium-high speed until soft peaks form.
- Gently fold the chilled coffee-chocolate mixture into the whipped cream using a spatula. Be careful not to deflate the whipped cream—this keeps the ice cream light and airy.
🛑 If using an ice cream maker, pour the mixture into the ice cream maker and churn according to the manufacturer’s instructions (usually 20-25 minutes).
Step 4: Create the Dark Chocolate Swirl
- Melt the dark chocolate in a double boiler or microwave in 15-second intervals, stirring between each interval until smooth.
- Stir in the sweetened condensed milk and instant espresso powder, mixing until silky.
- Let the mixture cool slightly to prevent it from melting the ice cream when layered.
Step 5: Layer & Freeze
- Pour half of the churned ice cream (or base mixture for no-churn) into a freezer-safe container.
- Drizzle half of the chocolate swirl over the ice cream and sprinkle with half of the chocolate chunks or espresso beans.
- Repeat the layers: remaining ice cream, chocolate swirl, and toppings.
- Use a knife or skewer to create a delicate marble effect by swirling the chocolate through the ice cream.
Step 6: Freeze & Serve
- Cover the ice cream container with plastic wrap or a tight-fitting lid to prevent freezer burn.
- Freeze for at least 6 hours (overnight is ideal for the perfect scoopable texture).
- Before serving, let the ice cream sit at room temperature for 5 minutes to soften slightly.
- Scoop and enjoy the perfect balance of rich chocolate, bold coffee, and silky creaminess!
🍨 Serving Suggestions: Elevate Your Mocha Noir Dream Ice Cream!
✨ Classic Style: Serve in a waffle cone with chocolate shavings on top.
☕ Café Affogato: Pour a shot of hot espresso over a scoop for a divine mocha affogato.
🍫 Gourmet Sundae: Drizzle with hot fudge, sprinkle with crushed Oreos, and add a dollop of whipped cream.
🍹 Cocktail Pairing: Enjoy alongside a glass of coffee liqueur or Irish cream for an adult-friendly dessert.
🎉 Pro Tips & Variations 🎉
✔ Want it extra intense? Use a stronger espresso brew and add an extra tablespoon of cocoa powder.
✔ Make it dairy-free! Swap heavy cream & milk for full-fat coconut milk, and use dairy-free dark chocolate.
✔ Add a crunchy twist! Stir in caramelized hazelnuts, toffee bits, or even crumbled biscotti.
✔ Turn it into a milkshake! Blend with a splash of milk and a scoop of Nutella for an ultra-creamy mocha milkshake.
🔄 Storing & Preserving Your Ice Cream
❄ Best Storage: Store in an airtight container to prevent ice crystals from forming.
⏳ Shelf Life: Homemade ice cream is best enjoyed within 2-3 weeks for peak flavor and texture.
🧊 Quick Fix for Hard Ice Cream: If too firm, let it sit at room temperature for 5-10 minutes before scooping.
Final Thoughts: A Coffee & Chocolate Lover’s Dream!
This Mocha Noir Dream Ice Cream is a true masterpiece—deep, rich, creamy, and loaded with bold coffee and luxurious dark chocolate flavors. Every spoonful is a perfect balance of bitterness and sweetness, making it an irresistible treat for any dessert lover.
Whether enjoyed solo, as part of a sundae, or in an affogato, this ice cream is guaranteed to impress!
🔥 Try it today and savor the perfect blend of coffee & chocolate! ☕🍫🍨